Here are the specs of Virtual Machine that I have experience with:
Windows 7 64-bit
Original size: 64GB (I would like to reduce the size by 15GB)
Proxmox PVE 4.x
Qemu KVM using QCOW2 file format
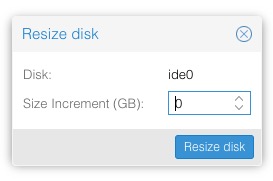
While you can increase the disk space easily just by using the Proxmox interface (see below), you CAN NOT reduce / shrink disk space. The reason why is simply because the operating system already allocated space internally, and you can not just reduce the space of the container without first reducing the space allocated by the OS.
Even though this blog was my experience with Windows 7, you should be able to use this technique with Windows 8 or 10.
I will show you all the steps I performed to reduce my QCOW2 image file.
STEP 1 - SHUT DOWN THE VM (optional - if you don't need backup go to step 3)
(you should know how to do this)
STEP 2 - BACKUP THE IMAGE FILE (optional - if you don't need backup go to step 3)
- login to your proxmox using ssh
- navigate to /var/lib/vz/images
- copy the QCOW2 file to another file / location like this:
cp vm-102-disk-1.qcow2 vm-102-disk-1-backup.qcow2
STEP 3 - START THE VM
(you should know how to do this)
STEP 4 - USE DISKPART TO REDUCE VOLUME SIZE
- login to Windows
- execute diskpart from command line: go to start menu, type 'diskpart' + enter
- use command line app 'diskpart' to reduce volume size, see example below for reducing my volume by 15GB:
list disk (optional - but necessary if you have multiple disks)
list volume
select volume 1
shrink desired=15360


STEP 5 - DOWNLOAD SDELETE and EXECUTE IT
- Download SDELETE directly from Microsoft website:
https://docs.microsoft.com/en-us/sysinternals/downloads/sdelete
- Execute sdelete from command line (this takes a long time - I think about 2 hours for me):


STEP 6 - SHUTDOWN THE VIRTUAL MACHINE
After sdelete has completed, immediately shutdown the window virtual machine.
STEP 7 - SHRINKING THE QCOW2 FILE
this is the last step, but before we execute qemu-img we should backup the original QCOW2 file by copying it to another filename ending with '-ORIGINAL'. Then we execute qemu-img. After the process finish you should test the Windows VM to make sure it is operating normally.
mv vm-105-disk-1.qcow2 vm-105-disk-1-ORIGINAL.qcow2
qemu-img convert -O qcow2 vm-105-disk-1-ORIGINAL.qcow2 vm-105-disk-1.qcow2
Also, don't forget to check the final size of the QCOW2 file. Mine shrunk to 26GB from 64GB, not sure why I got 26GB saving when I only asked for 15GB. But since everything works. I am happy to have had reclaimed more space. :-)
When all are done and you have tested the Windows VM to confirm everything still works after the shrinking process, you can delete the backup QCOW2 file.
Awesome! Thank you so much for sharing these kinds of information. Keep writing and updating something on MAV Shrink Disc.
ReplyDelete