Thursday, August 10, 2017

Running a copy of proxmox on different machine (different hardware configuration)

I was curious as of what would happen when you take a hard drive of a perfectly running Proxmox PVE from one server hardware to another server hardware. I can not find any answer on Google so I made the test and report my result here.

What I did ...

I simply take the SSD from my existing and perfectly running Proxmox VE 4 and install it in a completely different hardware (different motherboard, ram, network card, hard drives, etc...).

To my surprise Proxmox VE BOOTED UP WITHOUT ANY STOPPING ERROR!

After it has completely boot, since I am in the same local network, I was able to login to the same IP address as before.


What I have to do afterwards ...


  1. Identify and attach any additional storage to Proxmox
  2. Check 'dmesg' for boot errors
  3. Check system logs such as /var/log/syslog and /var/log/kern.log to make sure everything is okay.


I hope this helps someone who is wondering if you can simply take a hard drive / ssd from one Proxmox VE server to another completely different hardware... the answer is YES!

What is new in Proxmox VE 5.0


Proxmox VE 5.0 has just been released! (actual release date was July 2017)

We will tell you what new features are in Proxmox VE 5.0 and why you should be excited about these features.

We will also discuss a bit about the PROs and CONs of using / upgrading to Proxmox VE 5.0.

Proxmox VE 5.0 is based on Debian 9 codenamed "Stretch" with Linux Kernel 4.10

NEW FEATURES

  • New proxmox storage replication stack
  • Ceph updated to "Luminous" management tools
  • Console improvements

PROs

Being able to replicate Virtual Machine's data to other hardware node automatically (auto scheduled).
Much improved Ceph management.

CONs

None so far


WHAT IS PROXMOX VE

In case you don't know what is Proxmox VE, here is a basic description of what is Proxmox VE.

Proxmox VE is a virtualization platform. Proxmox VE community edition is open-source and free for anyone to use personally or commercially. Proxmox VE is an all-inclusive enterprise virtualization that tightly integrates KVM hypervisor and LXC containers. Proxmox VE also provides software-defined storage and networking functionality on a single platform, and easily manages high availability clusters and disaster recovery tools with the built-in web management interface.


Monday, August 7, 2017

Synching Date and Time using NTP for Proxmox

Time Synchronization (NTP) in Proxmox


For many years I have been thinking wrongly about this topic.  I thought I have to sync the time for each OpenVZ / LXC container against NTP servers.

 I have even wrote a blog about this:

Enable automatic time synchronization for OpenVZ container in Proxmox (for Ubuntu / Debian)

I have just found out that I was wrong and making this much more difficult.

Proxmox PVE actually will and should automatically sync time against NTP servers.  Again the key word here is SHOULD. If it does not you have to find out why and fix it. However if it works, the Proxmox PVE hardware node should always have the correct time and all the containers and virtual servers should also have accurate date and time automatically as well.

That is right folks, all Date and Time sync issue should be automatic. If they are not or your date and time is out of sync here are a few things I would recommend you check and try to fix on your Proxmox PVE hardware node.


CHECK POINT 1 - make sure your DNS resolution IP is correct

nano /etc/resolv.conf

Make sure all the entries in there are correct. My entries here are usually very simple, I just point all my servers to Google's DNS like this:


nameserver 8.8.8.8
nameserver 8.8.4.4


CHECK POINT 2 - make sure NTP client has not been corrupted

nano /etc/ntp.conf

You should change the content to:

server ntp1.internal.local iburst
server ntp2.internal.local iburst

then restart the NTP service:
service ntp restart


CHECK POINT 3 - Try to do a manual time synchronization

You should be able to perform this command without error:

ntpdate -s time.nist.gov

if you get error or ntpdate not found, you should try to install ntpdate using this command:

apt-get update
apt-get install ntpdate

Saturday, August 5, 2017

How to convert OpenVZ container to LXC container on Proxmox

I started with Proxmox 2.x many years ago. I deployed several Proxmox clusters however my biggest deployment was on Proxmox 3.x.

Proxmox 4.x and above dropped OpenVZ, that is right ... no more OpenVZ on Proxmox. It is okay though because LXC is just as good or even better.

For many people like myself who has lots of OpenVZ containers, the first concern is what do I do now? Am I stuck forever with OpenVZ? Will I ever be able to upgrade to Proxmox 4.x or above and use LXC?

The answer is surprising YES!

The process is actually easier than I thought.  Proxmox actually make it super easy. If you backup a OpenVZ container into a tar, tar.gz tar.lzo (compressed), you can simply copy it to the newer proxmox server with LXC into its 'dump' directory (usually in /var/lib/vz).

Here are all the steps:

STEP 1 - BACKUP THE OPENVZ CONTAINER


STEP 2 - COPY TO PROXMOX WHICH SUPPORT LXC

File OpenVZ backed up file is usually located in /var/lib/vz/dump directory of your Proxmox server.
You can copy using 'scp' or just download it to your computer, and copy it to its destination server manually.


STEP 3 - RESTORE AND CONVERT THE OPENVZ TO LXC

Login to the newer Proxmox which support LXC.
Click on the storage that contains the OpenVZ tar file.

Just restore it just like if you would with any LXC backed up file:


STEP 4 - ADJUST / CHANGE NETWORK SETTINGS

After you have successfully restore the OpenVZ and converted to LXC at the same time... the one setting that usually always get left behind (or messed up) is the network setting.

It also may be a good idea to review all the other options such as 'Resources', 'Options', etc... since you have moved the container from a different server... the new server may have different resources, etc...


STEP 5 - START AND TEST THE SERVER

You should see the LXC container works and boots as normal!


Shrinking a Windows Virtual Machine using Proxmox PVE which uses QEMU / KVM QCOW2 image format

I made a mistake by allocating too much disk space for my Windows 7 virtual machine.

Here are the specs of Virtual Machine that I have experience with:

Windows 7 64-bit
Original size: 64GB (I would like to reduce the size by 15GB)
Proxmox PVE 4.x
Qemu KVM using QCOW2 file format

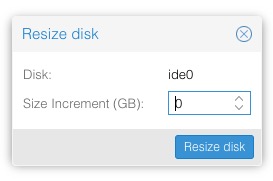
While you can increase the disk space easily just by using the Proxmox interface (see below), you CAN NOT reduce / shrink disk space. The reason why is simply because the operating system already allocated space internally, and you can not just reduce the space of the container without first reducing the space allocated by the OS.


You can only increment (increase) size, not decrease.


Even though this blog was my experience with Windows 7, you should be able to use this technique with Windows 8 or 10.

I will show you all the steps I performed to reduce my QCOW2 image file.


STEP 1 - SHUT DOWN THE VM (optional - if you don't need backup go to step 3)
(you should know how to do this)


STEP 2 - BACKUP THE IMAGE FILE (optional - if you don't need backup go to step 3)

  • login to your proxmox using ssh
  • navigate to /var/lib/vz/images
  • copy the QCOW2 file to another file / location like this:

    cp vm-102-disk-1.qcow2 vm-102-disk-1-backup.qcow2


STEP 3 - START THE VM
(you should know how to do this)


STEP 4 - USE DISKPART TO REDUCE VOLUME SIZE

  • login to Windows
  • execute diskpart from command line:  go to start menu, type 'diskpart' + enter
  • use command line app 'diskpart' to reduce volume size, see example below for reducing my volume by 15GB:

    list disk   (optional - but necessary if you have multiple disks)


    list volume


    select volume 1


    shrink desired=15360

STEP 5 - DOWNLOAD SDELETE and EXECUTE IT

STEP 6 - SHUTDOWN THE VIRTUAL MACHINE
After sdelete has completed, immediately shutdown the window virtual machine.

STEP 7 - SHRINKING THE QCOW2 FILE
this is the last step, but before we execute qemu-img we should backup the original QCOW2 file by copying it to another filename ending with '-ORIGINAL'. Then we execute qemu-img. After the process finish you should test the Windows VM to make sure it is operating normally.

mv vm-105-disk-1.qcow2 vm-105-disk-1-ORIGINAL.qcow2

qemu-img convert -O qcow2 vm-105-disk-1-ORIGINAL.qcow2 vm-105-disk-1.qcow2

Also, don't forget to check the final size of the QCOW2 file. Mine shrunk to 26GB from 64GB, not sure why I got 26GB saving when I only asked for 15GB. But since everything works. I am happy to have had reclaimed more space. :-)

When all are done and you have tested the Windows VM to confirm everything still works after the shrinking process, you can delete the backup QCOW2 file.