Thursday, August 25, 2016

Failed to remove or destroy openvz container in Proxmox

Something went wrong when I was creating and removing containers on Proxmox 3.x

Somehow I can not remove one of my OpenVZ container from Proxmox UI, I got this error

stat(/var/lib/vz/root/285): No such file or directory
Container is currently mounted (umount first)
TASK ERROR: command 'vzctl destroy 285' failed: exit code 41


I searched all over Google and did not find a solution. I fix the issue and found the following commands executed in the hardware node will solve this problem:

The VM ID that I am trying to remove is 285
The RED color commands are the commands that you need to solve this Fail to Destroy OpenVZ container issue.

I tried to destroy the VM from CLI but received the following error:
root@a11:~# vzctl destroy 285
stat(/var/lib/vz/root/285): No such file or directory
Container is currently mounted (umount first)

Then I tried to unmount it and still received error:
root@a11:~# vzctl umount 285
stat(/var/lib/vz/root/285): No such file or directory
realpath(/var/lib/vz/root/285) failed: No such file or directory
Can't umount /var/lib/vz/root/285: No such file or directory

So I created an empty directory to satisfy it
root@a11:~# mkdir /var/lib/vz/root/285
root@a11:~# vzctl umount 285
stat(/var/lib/vz/private/285): No such file or directory
Can't umount /var/lib/vz/root/285: Invalid argument

Still complaining about missing one more directory, so I created that one too
root@a11:~# mkdir /var/lib/vz/private/285
root@a11:~# vzctl umount 285
CT is not mounted

Finally able to unmount it, so I executed the destroy VM command next
root@a11:~# vzctl destroy 285
Destroying container private area: /var/lib/vz/private/285
Container private area was destroyed

Awesome! it works! I hope this helps someone :-)

Monday, June 6, 2016

PFSense firewall inside Proxmox using QEMU / KVM virtual machine - SLOW performance

Last week I attempted to install PfSense as qemu virtual machine in my Proxmox 4.x server.  I have an extra NIC with 1Gbps port and I thought it would be cool if I can retire my router and just route everything using PFSense because PFSense as a firewall is awesome (Tons of features).

I have installed it using the following steps, it was easy and I did not experience any issue:

1. Downloaded ISO (AMD64)  from PFsense download page
    at the time of this writing the newest stable AMD64 version was: pfSense-CE-2.3.1-RELEASE-amd64.iso
    I copied the live-cd ISO to /mnt/{your local storage}/template/iso

(I also included a link to my downloadable QEMU backup image - you can restore within 5 min - see below)

2. Edited my network interface setting at /etc/network/interfaces to add my extra NIC as VMBR1

I added:

allow-hotplug eth1
iface eth1 inet manual

auto vmbr1
iface vmbr1 inet dhcp
        bridge_ports eth1
        bridge_stp off
        bridge_fd 0


3. Created Proxmox VM with the following settings:
     CPU Type: 1 socket, 2 cores, default kvm64 (qemu64) did not work for me.
     RAM: 512MB
     Disk: 8GB, virtio (scsi, qcow2)
     Network:  Virtio (bridged)

here is a screenshot of my configuration in proxmox ve:


     Important:  Once PFSense web configurator is running, make sure to go in System > Advance > Networking and disable hardware checksum offload. If you do not do this network packets from LAN to WAN will be SLOW and will not work well.

here is a good read about Virtio network driver for PFSense:  https://doc.pfsense.org/index.php/VirtIO_Driver_Support


4. Once PFSense booted I also added the following options in /boot/loader.conf

hint.apic.0.clock=0
kern.hz=100

SLOW and DISAPPOINTING PERFORMANCE

After I got everything running and was able to use this PFSense firewall as my main router, I noticed the CPU utilization was much higher than I expected.

In proxmox, this VM CPU utilization was 15 - 40%

In PFSense dashboard CPU utilization reported 20% - 87%

Then I performed some speed tests... I was disappointed. This PFSense VM performed 40% slower than my Netgear / Asus gigabit router!  I have a gigabit internet connectivity, I can get approximately 800Mbps - 920Mbps on my AC Wireless routers. However with this PFSense VM I can only achieve 350 - 480Mbps?!?  And when I was doing speedtest (from Speedtest.net) CPU Utilization on PFSense dashboard went up to 87%!!!

Summary

After spending 4 - 5 hours installing and setting up PFSense on Proxmox, I decided not to use it. I am disappointed with its performance!  I use PFSense at work (also virtualized inside Proxmox) and I am very happy with it.  Maybe the high CPU usage and slow performance I get is due to my J1900 Quad Celeron CPU that I have in my home server?!?  Not sure.


Downloadable PFSense QEMU / KVM Image Download

Event though I have decided NOT to use this PFSense VM configuration, I have a completely new and tested working PFSense configuration with default settings.

If you need to get up and running quickly with version PFSense version 2.3.1 for Proxmox QEMU you can download my image here:

https://dl.dropboxusercontent.com/u/32732184/vzdump-qemu-106-2016_06_06-11_33_43-pfsense-231.vma.lzo

Things to do after you 'restored' the image above:

1. set your network and turn them on.
    for both net0 and net1 I have set them both to VMBR0 so that you can boot the PFSense immediately. But you probably want to set net1 to VMBR1.

2. I also have set the link to disconnected, link down=1, so you probably want to enable them both to use them.


Wednesday, March 30, 2016

Redirect ports for Remote Desktop RDP into QEMU / KVM Virtual Machine in Proxmox NAT Mode

I have a virtual machine running Window 7 for a client. I have been trying to allow the client to use their Window 7 machine via remote desktop (RDP). However since I have configured the QEMU / KVM virtual machine in Proxmox using NAT mode networking, the local IP address that is being assigned to the machine is 10.0.2.15 and I have had difficulty figuring out how to allow RDP traffic to connect to the virtual machine.

Since I have spent hours (barely anything useful googling around) trying to figure this out, I hope this may help somebody.

The solution was to REDIRECT the port from the Proxmox hardware node to the VM using the -redir setting.

First you would want to test the concept by typing the following commands into your SSH Shell:

qm set 123 -args "--redir tcp:30889::3389"
qm set 123 -args "--redir udp:30889::3389"

The commands above will redirect both TCP and UDP protocol from the hardware node's port 30889 to the virtual machine's port 3389.

I choose 30889 (different than the default RDP 3389 port) on purpose to show we are redirecting (kind of like port forwarding). Another reason is because I always use non-default ports to prevent brute force attacks (hope to make it more difficult for hackers to guess).

Once you successfully executed the commands above, you should then try to connect via remote desktop. Remember to use port 30889 to connect.

If the above works... then you need to make this option permanent for your hardware node by adding the following line in your QEMU SERVER configuration file:

args: -redir tcp: 30889::3389 -redir udp: 30889::3389

your vm configuration file should be located in:
/etc/pve/qemu-server

Here is the exact content of my configuration file:

args: -redir tcp: 30889::3389 -redir udp: 30889::3389
bootdisk: ide0
cores: 4
ide0: localmd0:123/vm-123-disk-1.qcow2,format=qcow2,size=64G
memory: 8192
name: ihtirqb
net0: e1000={myhiddenmacaddress}
numa: 0
onboot: 1
ostype: win7
sockets: 1


Monday, March 21, 2016

Proxmox commands cheat sheet to be executed in hardware node

# ---- CHECK PVE CLUSTER STATUS

pvecm status
pvecm nodes

pveversion -v

# ---- STOP PVE SERVICES -----

service pvestatd stop
service pvedaemon stop
service cman stop
killall -9 corosync cman dlm_controld fenced
service cman stop
service pve-cluster stop

# ---- START PVE SERVICES -----

service pve-cluster start
service cman start
service pvedaemon start
service pvestatd start

# ---- OPENVZ --------
vzlist -a

# ---- QEMU --------
qm list

Sunday, February 28, 2016

How to install Plex Server (FREE) on your Proxmox

Plex is a media server. It is a mature project with native Apps on many popular TVs, Tablets, Computers and Phones.

Plex Media Server will help you catalog and playback your Movies, Videos, and Photos over your local network or over the internet.

Plex Media Server is FREE to download and install on your server. As of this writing Plex supports Mac, Windows, and Linux.  They are able to deliver this on multi-platform because they use Java.

I am using my Low Cost and Low Powered Home Proxmox Server I have described here:

http://proxmox-openvz.blogspot.com/2015/11/proxmox-v4x-mini-home-server-with-less.html

Here is a link to Plex's features:

https://plex.tv/features

I use Plex Media Server on my home (Proxmox) server so that my family can easily browse, search and playback home movies, videos and photos easily in almost every electronic device we have on our home.  For example we can have slideshow of our most recent vacation displayed on our living room Smart TV.

BTW, Plex Media Server can also be used on most major browser, which means if you Smart TV have an Android like (webkit) type of browser, it will most likely be able to be used as a Plex client. Which means you can playback movies, videos and photos on your TV using its built-in browser.

If you have a Roku, you can use its Plex Client App.

On you phones and tablets, you can download Plex App (not free), or you can just use your browser (free).

I hope that is a good introduction and enough to get you interested in Plex Media Server.

Lets get down to business about how to install Plex Media Server to your Proxmox Linux container:

Pre-Requisites:


  • Proxmox server any version (you can use OpenVZ / LXC does not matter).
  • Linux Container with Ubuntu 12.04 or higher
  • Plex Media Server Debian package from: https://plex.tv/downloads


Installation Steps:

Update your packages:

apt-get update

Download Plex Media Server package:

wget https://downloads.plex.tv/plex-media-server/0.9.12.19.1537-f38ac80/plexmediaserver_0.9.12.19.1537-f38ac80_amd64.deb

Install Plex Media Server package:

dpkg -i plexmediaserver_0.9.12.19.1537-f38ac80_amd64.deb


(optional) Mount your file server's directories:

See this article to learn how to mount external directory to your Plex Media Server


Go to your browser to set initial settings (my server is on local IP 192.168.1.11:

http://192.168.1.11


Add a channel (I am adding my Home Videos first):


Then, select "as many" folders from your server to be included as part of this channel:


This is what my Home Video channel setting looks like after I added 2 folders:


Scan for Videos inside the channel to index new videos:


Then, you should repeat the above steps to create more channels.  I have the following channels on my Plex Media Server (for example):

Home Videos
Movies
Photos


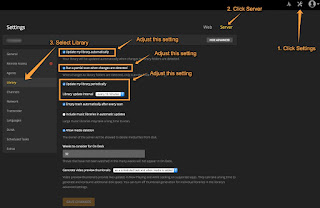
Configure Setting to Auto-Scan Periodically / Automatically:


THAT IS ALL!

You now have a fully functioning Plex Media Server running on your Home Proxmox Server.
Everytime somebody adds a new Movie, Photo or Video, Plex Media Server will automatically scan and update its database.  And now everybody in your home can easily enjoy these media on any device in your home!!!


Tuesday, February 23, 2016

How to add a shared directory between OpenVZ containers?

This is how I share a directory between 2 or more OpenVZ containers.  Basically I use a process called:

Mounting a Directory from Hardware Node:

http://proxmox-openvz.blogspot.com/2016/02/how-to-mount-directory-from-hardware.html


When you are able to mount a directory from Hardware Node you can have many OpenVZ containers mounting the same directory, which makes sharing directory between OpenVZ containers a reality.

You can even share directory between different physical servers. To do this, just create a network file sharing directory between your physical servers first (for example you can use NFS). Then you can mount all of these NFS mounted directories into your OpenVZ containers.

Simple and it works!

How to mount a directory from hardware node inside OpenVZ container

Sometime it is handy to be able to access a directory from the bare-metal hardware node itself.

One common use of this technique for me is to mount a shared SSD drive which is used by many OpenVZ containers. Since the SSD drive is mounted directly to the bare-metal OS for ie: /mnt/ssd.

Another purpose is to be able to have a common shared directory in the bare-metal server shared between many OpenVZ containers on that server.  The shared directory can even be an NFS Server which means you can have a shared directory between many OpenVZ located in different hardware nodes!  Now that is Cool!

Anyways this is the technique:

1. CREATE THE DESTINATION DIRECTORY

Login to the OpenVZ container where you will be mounting, create the directory and assign all permission. (in this example we will use /mnt/shared_dir as the destination directory path)

mkdir /mnt/shared_dir
chmod 777 /mnt/shared_dir

2. CREATE .mount FILE

Login to shell of your Proxmox hardware node to create <vmid>.mount file.
(in this example you should replace <vmid> with your actual OpenVZ container ID)
(in this example we assume you are trying to share /mnt/ssd from your hardware node)

cd /etc/pve/openvz
nano <vmid>.mount

Type in the following content in your <vmid>.mount file:

#!/bin/bash
. /etc/vz/vz.conf
. ${VE_CONFFILE}
SRC=/mnt/ssd
DST=/mnt/shared_dir
if [ ! -e ${VE_ROOT}${DST} ]; then mkdir -p ${VE_ROOT}${DST}; fi
mount -o noatime -n -t simfs ${SRC} ${VE_ROOT}${DST} -o ${SRC}


3. RESTART THE OPENVZ CONTAINER and TEST

Once you restart your OpenVZ, log into it and issue the following command:

df -h

You should see a new row describing your newly mounted directory.

mount

The mount command can also help you confirm it has been mounted.

What are the differences between LXC and OpenVZ?

Differences between LXC and OpenVZ

There are many articles showing tables and matching feature by feature between LXC and OpenVZ. However I was looking for the 'differences' only, which in my opinion makes all the 'difference'. :-) Just kidding. Anyhow I did some research and as of my writing today Feb 23, 2016 here are the major differences between LXC and OpenVZ that you should know:

LXC

  • built into linux kernel
  • pretty young (started 1st first 0.1.0 released in 2008)
  • Isolation method: use Cgroups and Namespaces
  • Does not support Live Migration yet (as of Feb 2016)
  • No Storage I/O priority
  • Partial Container Lockdown
  • Can Not limit kernel memory usage


OpenVZ

  • patched kernel
  • shared same developers as LXC (but started earlier)
  • Isolation method: use Jails or Zones
  • Support Live Migration
  • Has Storage I/O priority
  • Full Container Lockdown
  • Can limit kernel memory usage